1. Introduction
The PyVCP (Python Virtual Control Panel) is designed to give the integrator the ability to customize the AXIS interface with buttons and indicators to do special tasks.
Hardware machine control panels can use up a lot of I/O pins and can be expensive. That is where Virtual Control Panels have the advantage as well as it cost nothing to build a PyVCP.
Virtual Control Panels can be used for testing or monitoring things to temporarily replace real I/O devices while debugging ladder logic, or to simulate a physical panel before you build it and wire it to an I/O board.
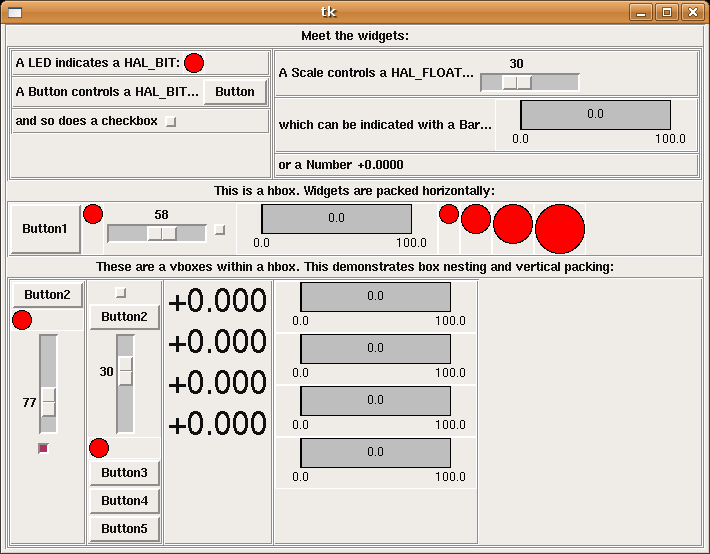
The following graphic displays many of the PyVCP widgets.
2. Panel Construction
The layout of a PyVCP panel is specified with an XML file that contains widget tags between <pyvcp> and </pyvcp>. For example:
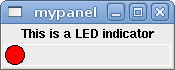
<pyvcp>
    <label text="This is a LED indicator"/>
    <led/>
</pyvcp>
If you place this text in a file called tiny.xml, and run
halrun -I loadusr pyvcp -c mypanel tiny.xml
PyVCP will create the panel for you, which includes two widgets, a Label with the text This is a LED indicator, and a LED, used for displaying the state of a HAL BIT signal. It will also create a HAL component named mypanel (all widgets in this panel are connected to pins that start with mypanel.). Since no <halpin> tag was present inside the <led> tag, PyVCP will automatically name the HAL pin for the LED widget mypanel.led.0
For a list of widgets and their tags and options, see the widget reference below.
Once you have created your panel, connecting HAL signals to and from the PyVCP pins is done with the halcmd:
net <signal-name> <pin-name> <opt-direction> <opt-pin-name>signal-name
If you are new to HAL, the HAL basics chapter in the Integrator Manual is a good place to start.
3. Security
Parts of PyVCP files are evaluated as Python code, and can take any action available to Python programs. Only use PyVCP .xml files from a source that you trust.
4. AXIS
Since AXIS uses the same GUI toolkit (Tkinter) as PyVCP, it is possible to include a PyVCP panel on the right side of the normal AXIS user interface. A typical example is explained below.
Place your PyVCP XML file describing the panel in the same directory where your .ini file is. Say we we want to display the current spindle speed using a Bar widget. Place the following in a file called spindle.xml:
<pyvcp>
    <label>
        <text>"Spindle speed:"</text>
    </label>
    <bar>
        <halpin>"spindle-speed"</halpin>
        <max_>5000</max_>
    </bar>
</pyvcp>
Here we’ve made a panel with a Label and a Bar widget, specified that the HAL pin connected to the Bar should be named spindle-speed, and set the maximum value of the bar to 5000 (see widget reference below for all options). To make AXIS aware of this file, and call it at start up, we need to specify the following in the [DISPLAY] section of the .ini file:
PYVCP = spindle.xml
To make our widget actually display the spindle-speed it needs to be hooked up to the appropriate HAL signal. A .hal file that will be run once AXIS and PyVCP have started can be specified in the [HAL] section of the .ini file:
POSTGUI_HALFILE = spindle_to_pyvcp.hal
This change will run the HAL commands specified in spindle_to_pyvcp.hal. In our example the contents could look like this:
net spindle-rpm-filtered => pyvcp.spindle-speed
assuming that a signal called spindle-rpm-filtered already exists. Note that when running together with AXIS, all PyVCP widget HAL pins have names that start with pyvcp..
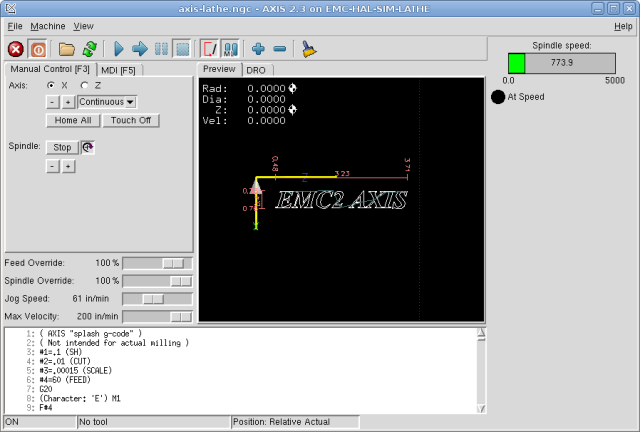
This is what the newly created PyVCP panel should look like in AXIS. The sim/lathe configuration is already configured this way.
5. Stand Alone
This section describes how PyVCP panels can be displayed on their own with or without LinuxCNC’s machine controller.
To load a stand alone PyVCP panel with LinuxCNC use these commands:
loadusr -Wn mypanel pyvcp -g WxH+X+Y -c mypanel <path/>panel_file.xml
You would use this if you wanted a floating panel or a panel with a GUI other than AXIS.
-
-Wn panelname - makes HAL wait for the component panelname to finish loading (become ready in HAL speak) before processing more HAL commands. This is important because PyVCP panels export HAL pins, and other HAL components will need them present to connect to them. Note the capital W and lowercase n. If you use the -Wn option you must use the -c option to name the panel.
-
pyvcp < -g> < -c> panel.xml - builds the panel with the optional geometry and/or panelname from the xml panel file. The panel.xml can be any name that ends in .xml. The .xml file is the file that describes how to build the panel. You must add the path name if the panel is not in the directory that the HAL script is in.
-
-g <WxH><+X+Y> - specifies the geometry to be used when constructing the panel. The syntax is Width x Height + X Anchor + Y Anchor. You can set the size or position or both. The anchor point is the upper left corner of the panel. An example is -g 250x500+800+0 This sets the panel at 250 pixels wide, 500 pixels tall, and anchors it at X800 Y0.
-
-c panelname - tells PyVCP what to call the component and also the title of the window. The panelname can be any name without spaces.
To load a stand alone PyVCP panel without LinuxCNC use this command:
loadusr -Wn mypanel pyvcp -g 250x500+800+0 -c mypanel mypanel.xml
The minimum command to load a pyvcp panel is:
loadusr pyvcp mypanel.xml
You would use this if you want a panel without LinuxCNC’s machine controller such as for testing or a standalone DRO.
The loadusr command is used when you also load a component that will stop HAL from closing until it’s done. If you loaded a panel and then loaded Classic Ladder using loadusr -w classicladder, CL would hold HAL open (and the panel) until you closed CL. The -Wn above means wait for the component -Wn "name" to become ready. (name can be any name. Note the capital W and lowercase n.) The -c tells PyVCP to build a panel with the name panelname using the info in panel_file_name.xml. The name panel_file_name.xml can be any name but must end in .xml - it is the file that describes how to build the panel. You must add the path name if the panel is not in the directory that the HAL script is in.
An optional command to use if you want the panel to stop HAL from continuing commands / shutting down. After loading any other components you want the last HAL command to be:
waituser panelname
This tells HAL to wait for component panelname to close before continuing HAL commands. This is usually set as the last command so that HAL shuts down when the panel is closed.
6. Widgets
HAL signals come in two variants, bits and numbers. Bits are off/on signals. Numbers can be float, s32 or u32. For more information on HAL data types see the HAL manual. The PyVCP widget can either display the value of the signal with an indicator widget, or modify the signal value with a control widget. Thus there are four classes of PyVCP widgets that you can connect to a HAL signal. A fifth class of helper widgets allow you to organize and label your panel.
-
Widgets for indicating bit signals: led, rectled
-
Widgets for controlling bit signals: button, checkbutton, radiobutton
-
Widgets for indicating number signals: number, s32, u32, bar, meter
-
Widgets for controlling number signals: spinbox, scale, jogwheel
-
Helper widgets: hbox, vbox, table, label, labelframe
6.1. Syntax
Each widget is described briefly, followed by the markup used, and a screen shot. All tags inside the main widget tag are optional.
6.2. General Notes
At the present time, both a tag-based and an attribute-based syntax are supported. For instance, the following XML fragments are treated identically:
<led halpin="my-led"/>
and
<led><halpin>"my-led"</halpin></led>
When the attribute-based syntax is used, the following rules are used to turn the attributes value into a Python value:
-
If the first character of the attribute is one of the following, it is evaluated as a Python expression: {(["'
-
If the string is accepted by int(), the value is treated as an integer
-
If the string is accepted by float(), the value is treated as floating-point
-
Otherwise, the string is accepted as a string.
When the tag-based syntax is used, the text within the tag is always evaluated as a Python expression.
The examples below show a mix of formats.
6.2.1. Comments
To add a comment use the xml syntax for a comment.
<!-- My Comment -->6.2.2. Editing the XML file
Edit the XML file with a text editor. In most cases you can right click on the file and select open with text editor or similar.
6.2.3. Colors
Colors can be specified using the X11 rgb colors by name gray75 or hex #0000ff. A complete list is located here http://sedition.com/perl/rgb.html.
Common Colors (colors with numbers indicate shades of that color)
-
white
-
black
-
blue and blue1 - 4
-
cyan and cyan1 - 4
-
green and green1 - 4
-
yellow and yellow1 - 4
-
red and red1 - 4
-
purple and purple1 - 4
-
gray and gray0 - 100
6.2.4. HAL Pins
HAL pins provide a means to connect the widget to something. Once you create a HAL pin for your widget you can connect it to another HAL pin with a net command in a .hal file. For more information on the net command see the HAL Commands section of the HAL manual.
6.3. Label
A label is a piece of text on your panel.
The label has an optional disable pin that is created when you add <disable_pin>True</disable_pin>.
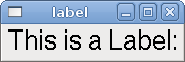
<label>
    <text>"This is a Label:"</text>
    <font>("Helvetica",20)</font>
    <disable>False</disable>
</label>
The above code produced this example.
6.4. Multi_Label
An extention of the text label.
Selectable text label, can display up to 6 label legends when associated bit pin is activated
Attach each legend pin to a signal and get a descriptive label when the signal is TRUE.
If more than one legend pin is TRUE, the highest numbered TRUE legend will be displayed.
<multilabel>
    <legends>["Label1" "Label2" "Label3" "Label4" "Label5" "Label6"]</legends>
    <font>("Helvetica",20)</font>
    <disable>False</disable>
</multilabel>
6.5. LEDs
A LED is used to indicate the status of a bit halpin. The LED color will be on_color when the halpin is true, and off_color otherwise.
-
<halpin> - sets the name of the pin, default is led.n, where n is an integer
-
<size> - sets the size of the led, default is 20
-
<on_color> - sets the color of the LED when the pin is true. default is green
-
<off_color> - sets the color of the LED when the pin is false. default is red
-
<disable_pin> - when true adds a disable pin to the led.
-
<disabled_color> - sets the color of the LED when the pin is disabled.
6.5.1. Round LED
<led>
    <halpin>"my-led"</halpin>
    <size>50</size>
    <on_color>"green"</on_color>
    <off_color>"red"</off_color>
</led>
The above code produced this example.

6.5.2. Rectangle LED
This is a variant of the led widget.
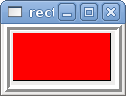
<vbox>
    <relief>RIDGE</relief>
    <bd>6</bd>
    <rectled>
        <halpin>"my-led"</halpin>
        <height>"50"</height>
        <width>"100"</width>
        <on_color>"green"</on_color>
        <off_color>"red"</off_color>
    </rectled>
</vbox>
The above code produced this example. Also showing a vertical box with relief.
6.6. Buttons
A button is used to control a BIT pin. The pin will be set True when the button is pressed and held down, and will be set False when the button is released. Buttons can use the following formatting options
-
<padx>n</padx> - where n is the amount of extra horizontal extra space
-
<pady>n</pady> - where n is the amount of extra vertical extra space
-
<activebackground>"color"</activebackground> - the cursor over color
-
<bg>"color"</bg> - the color of the button
6.6.1. Text Button
A text button controls a bit halpin. The halpin is false until the button is pressed then it is true. The button is a momentary button.
The text button has an optional disable pin that is created when you add <disable_pin>True</disable_pin>.
<button>
    <halpin>"ok-button"</halpin>
    <text>"OK"</text>
</button>
<button>
    <halpin>"abort-button"</halpin>
    <text>"Abort"</text>
</button
The above code produced this example.

6.6.2. Checkbutton
A checkbutton controls a bit halpin. The halpin will be set True when the button is checked, and false when the button is unchecked. The checkbutton is a toggle type button. The Checkbuttons may be set initially as TRUE or FALSE the initval field A pin called changepin is also created automatically, which can toggle the Checkbutton via HAL, if the value linked is changed, to update the display remotely
<checkbutton>
    <halpin>"coolant-chkbtn"</halpin>
    <text>"Coolant"</text>
    <initval>1</initval>
</checkbutton>
<checkbutton>
    <halpin>"chip-chkbtn"</halpin>
    <text>"Chips    "</text>
    <initval>0</initval>
</checkbutton>
The above code produced this example. The coolant checkbutton is checked. Notice the extra spaces in the Chips text to keep the checkbuttons aligned.

6.6.3. Radiobutton
A radiobutton will set one of the halpins true. The other pins are set false. The initval field may be set to choose the default selection when the panel displays. Only one radio button may be set to TRUE (1) or only the highest number pin set TRUE will have that value.
<radiobutton>
    <choices>["one","two","three"]</choices>
    <halpin>"my-radio"</halpin>
    <initval>0</initval>
</radiobutton>
The above code produced this example.

Note that the HAL pins in the example above will me named my-radio.one, my-radio.two, and my-radio.three. In the image above, one is the selected value.
6.7. Number Displays
Number displays can use the following formatting options
-
<font>("Font Name",n)</font> where n is the font size
-
<width>n</width> where n is the overall width of the space used
-
<justify>pos</justify> where pos is LEFT, CENTER, or RIGHT (doesn’t work)
-
<padx>n</padx> where n is the amount of extra horizontal extra space
-
<pady>n</pady> where n is the amount of extra vertical extra space
6.7.1. Number
The number widget displays the value of a float signal.
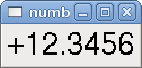
<number>
    <halpin>"my-number"</halpin>
    <font>("Helvetica",24)</font>
    <format>"+4.4f"</format>
</number>
The above code produced this example.
-
<font> - is a Tkinter font type and size specification. One font that will show up to at least size 200 is courier 10 pitch, so for a really big Number widget you could specify:
<font>("courier 10 pitch",100)</font>
-
<format> - is a C-style format specified that determines how the number is displayed.
6.7.2. s32 Number
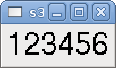
The s32 number widget displays the value of a s32 number. The syntax is the same as number except the name which is <s32>. Make sure the width is wide enough to cover the largest number you expect to use.
<s32>
    <halpin>"my-number"</halpin>
    <font>("Helvetica",24)</font>
    <format>"6d"</format>
    <width>6</width>
</s32>
The above code produced this example.
6.7.3. u32 Number
The u32 number widget displays the value of a u32 number. The syntax is the same as number except the name which is <u32>.
6.7.4. Bar
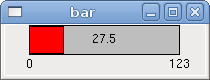
A bar widget displays the value of a FLOAT signal both graphically using a bar display and numerically. The colour of the bar can be set as one colour throughout its range (default using fillcolor) or set to change colour dependent upon the value of the halpin (range1, range2 range3 must all be set, if you only want 2 ranges, set 2 of them to the same colour)
<bar>
    <halpin>"my-bar"</halpin>
    <min_>0</min_>
    <max_>150</max_>
    <bgcolor>"grey"</bgcolor>
    <fillcolor>"red"</fillcolor>
    <range1>0,100,"green"</range1>
    <range2>101,135,"orange"</range1>
    <range3>136, 150,"red"</range1>
</bar>
The above code produced this example.
6.7.5. Meter
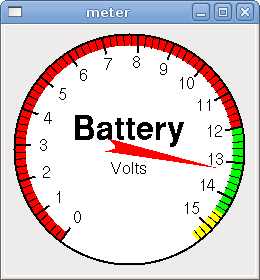
Meter displays the value of a FLOAT signal using a traditional dial indicator.
<meter>
    <halpin>"mymeter"</halpin>
    <text>"Battery"</text>
    <subtext>"Volts"</subtext>
    <size>250</size>
    <min_>0</min_>
    <max_>15.5</max_>
    <majorscale>1</majorscale>
    <minorscale>0.2</minorscale>
    <region1>(14.5,15.5,"yellow")</region1>
    <region2>(12,14.5,"green")</region2>
    <region3>(0,12,"red")</region3>
</meter>
The above code produced this example.
6.8. Number Inputs
6.8.1. Spinbox
Spinbox controls a FLOAT pin. You increase or decrease the value of the pin by either pressing on the arrows, or pointing at the spinbox and rolling your mouse-wheel. If the param_pin field is set TRUE(1), a pin will be created that can be used to set the spinbox to an initial value and to remotely alter its value without HID input
<spinbox>
    <halpin>"my-spinbox"</halpin>
    <min_>-12</min_>
    <max_>33</max_>
    <initval>0</initval>
    <resolution>0.1</resolution>
    <format>"2.3f"</format>
    <font>("Arial",30)</font>
    <param_pin>1</param_pin>
</spinbox>
The above code produced this example.

6.8.2. Scale
Scale controls a float or a s32 pin. You increase or decrease the value of the pin be either dragging the slider, or pointing at the scale and rolling your mouse-wheel. The halpin will have both -f and -i added to it to form the float and s32 pins. Width is the width of the slider in vertical and the height of the slider in horizontal orientation. If the param_pin field is set TRUE(1), a pin will be created that can be used to set the spinbox to an initial value and to remotely alter its value without HID input
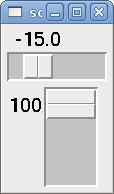
<scale>
    <font>("Helvetica",16)</font>
    <width>"25"</width>
    <halpin>"my-hscale"</halpin>
    <resolution>0.1</resolution>
    <orient>HORIZONTAL</orient>
    <initval>-15</initval>
    <min_>-33</min_>
    <max_>26</max_>
    <param_pin>1</param_pin>
</scale>
<scale>
    <font>("Helvetica",16)</font>
    <width>"50"</width>
    <halpin>"my-vscale"</halpin>
    <resolution>1</resolution>
    <orient>VERTICAL</orient>
    <min_>100</min_>
    <max_>0</max_>
    <param_pin>1</param_pin>
</scale>
The above code produced this example.
6.8.3. Dial
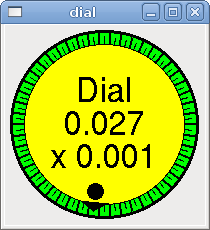
The Dial outputs a HAL float and reacts to both mouse wheel and dragging. Double left click to increase the resolution and double right click to reduce the resolution by one digit. The output is capped by the min and max values. The <cpr> is how many tick marks are on the outside of the ring (beware of high numbers). If the param_pin field is set TRUE(1), a pin will be created that can be used to set the spinbox to an initial value and to remotely alter its value without HID input
<dial>
    <size>200</size>
    <cpr>100</cpr>
    <min_>-15</min_>
    <max_>15</max_>
    <text>"Dial"</text>
    <initval>0</initval>
    <resolution>0.001</resolution>
    <halpin>"anaout"</halpin>
    <dialcolor>"yellow"</dialcolor>
    <edgecolor>"green"</edgecolor>
    <dotcolor>"black"</dotcolor>
    <param_pin>1</param_pin>
</dial>
The above code produced this example.
6.8.4. Jogwheel
Jogwheel mimics a real jogwheel by outputting a FLOAT pin which counts up or down as the wheel is turned, either by dragging in a circular motion, or by rolling the mouse-wheel.
<jogwheel>
    <halpin>"my-wheel"</halpin>
    <cpr>45</cpr>
    <size>250</size>
</jogwheel>
The above code produced this example.

6.9. Images
Image displays use only .gif image format. All of the images must be the same size. The images must be in the same directory as your ini file (or in the current directory if running from the command line with halrun/halcmd).
6.9.1. Image Bit
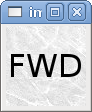
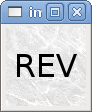
The image_bit toggles between two images by setting the halpin to true or false.
<image name='fwd' file='fwd.gif'/>
<image name='rev' file='rev.gif'/>
<vbox>
    <image_bit halpin='selectimage' images='fwd rev'/>
</vbox>
This example was produced from the above code. Using the two image files fwd.gif and rev.gif. FWD is displayed when selectimage is false and REV is displayed when selectimage is true.
6.9.2. Image u32
The image_u32 is the same as image_bit except you have essentially an unlimited number of images and you select the image by setting the halpin to a integer value with 0 for the first image in the images list and 1 for the second image etc.
<image name='stb' file='stb.gif'/>
<image name='fwd' file='fwd.gif'/>
<image name='rev' file='rev.gif'/>
<vbox>
    <image_u32 halpin='selectimage' images='stb fwd rev'/>
</vbox>
The above code produced the following example by adding the stb.gif image.
Notice that the default is the min even though it is set higher than max unless there is a negative min.
6.10. Containers
Containers are widgets that contain other widgets. Containers are used to group other widgets.
6.10.1. Borders
Container borders are specified with two tags used together. The <relief> tag specifies the type of border and the <bd> specifies the width of the border.
-
<relief>type</relief> - Where type is FLAT, SUNKEN, RAISED, GROOVE, or RIDGE
-
<bd>n</bd> - Where n is the width of the border.
<hbox>
    <button>
        <relief>FLAT</relief>
        <text>"FLAT"</text>
        <bd>3</bd>
    </button>
    <button>
        <relief>SUNKEN</relief>
        <text>"SUNKEN"</text>
        <bd>3</bd>
    </button>
    <button>
        <relief>RAISED</relief>
        <text>"RAISED"</text>
        <bd>3</bd>
    </button>
    <button>
        <relief>GROOVE</relief>
        <text>"GROOVE"</text>
        <bd>3</bd>
    </button>
    <button>
        <relief>RIDGE</relief>
        <text>"RIDGE"</text>
        <bd>3</bd>
    </button>
</hbox>
The above code produced this example.

6.10.2. Hbox
Use an Hbox when you want to stack widgets horizontally next to each other.
<hbox>
    <relief>RIDGE</relief>
    <bd>6</bd>
    <label><text>"a hbox:"</text></label>
    <led></led>
    <number></number>
    <bar></bar>
</hbox>
The above code produced this example.
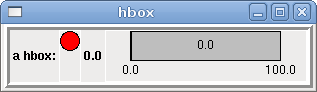
Inside an Hbox, you can use the <boxfill fill=""/>, <boxanchor anchor=""/>, and <boxexpand expand=""/> tags to choose how items in the box behave when the window is re-sized. For details of how fill, anchor, and expand behave, refer to the Tk pack manual page, pack(3tk). By default, fill="y", anchor="center", expand="yes".
6.10.3. Vbox
Use a Vbox when you want to stack widgets vertically on top of each other.
<vbox>
    <relief>RIDGE</relief>
    <bd>6</bd>
    <label><text>"a vbox:"</text></label>
    <led></led>
    <number></number>
    <bar></bar>
</vbox>
The above code produced this example.
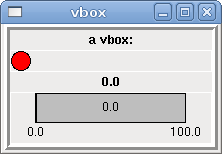
Inside a Hbox, you can use the <boxfill fill=""/>, <boxanchor anchor=""/>, and <boxexpand expand=""/> tags to choose how items in the box behave when the window is re-sized. For details of how fill, anchor, and expand behave, refer to the Tk pack manual page, pack(3tk). By default, fill="x", anchor="center", expand="yes".
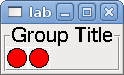
6.10.4. Labelframe
A labelframe is a frame with a groove and a label at the upper-left corner.
<labelframe text="Group Title">
    <font>("Helvetica",16)</font>
    <hbox>
    <led/>
    <led/>
    </hbox>
</labelframe>
The above code produced this example.
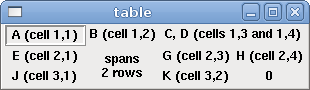
6.10.5. Table
A table is a container that allows layout in a grid of rows and columns. Each row is started by a <tablerow/> tag. A contained widget may span rows or columns through the use of the <tablespan rows= cols=/> tag. The sides of the cells to which the contained widgets “stick” may be set through the use of the <tablesticky sticky=/> tag. A table expands on its flexible rows and columns.
Example:
<table flexible_rows="[2]" flexible_columns="[1,4]">
<tablesticky sticky="new"/>
<tablerow/>
    <label>
        <text>" A (cell 1,1) "</text>
        <relief>RIDGE</relief>
        <bd>3</bd>
    </label>
    <label text="B (cell 1,2)"/>
    <tablespan columns="2"/>
    <label text="C, D (cells 1,3 and 1,4)"/>
<tablerow/>
    <label text="E (cell 2,1)"/>
    <tablesticky sticky="nsew"/>
    <tablespan rows="2"/>
    <label text="'spans\n2 rows'"/>
    <tablesticky sticky="new"/>
    <label text="G (cell 2,3)"/>
    <label text="H (cell 2,4)"/>
<tablerow/>
    <label text="J (cell 3,1)"/>
    <label text="K (cell 3,2)"/>
    <u32 halpin="test"/>
</table>
The above code produced this example.
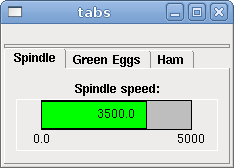
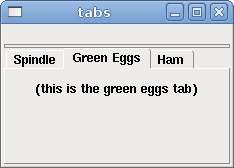
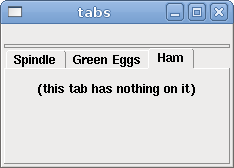
6.10.6. Tabs
A tabbed interface can save quite a bit of space.
<tabs>
    <names> ["spindle","green eggs"]</names>
</tabs>
<tabs>
    <names>["Spindle", "Green Eggs", "Ham"]</names>
    <vbox>
        <label>
            <text>"Spindle speed:"</text>
        </label>
        <bar>
            <halpin>"spindle-speed"</halpin>
            <max_>5000</max_>
        </bar>
    </vbox>
    <vbox>
        <label>
            <text>"(this is the green eggs tab)"</text>
        </label>
    </vbox>
    <vbox>
        <label>
            <text>"(this tab has nothing on it)"</text>
        </label>
    </vbox>
</tabs>
The above code produced this example showing each tab selected.